Overview
This program is used to access a list view of existing Journal Entries and to create new Journal Entries. It is an alternative to the General Journal Entries function on the site map.
Background Information
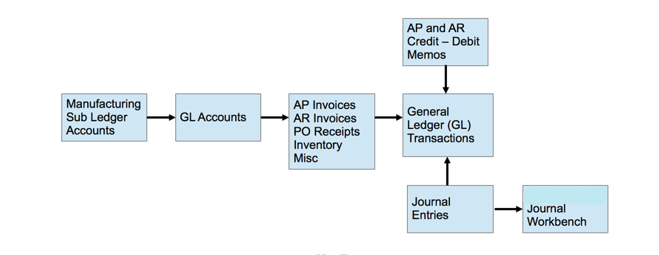
Financial transactions other than those originating in AP, AR, and Inventory flows are entered as Journal Entries and are posted to General Ledger when they are finished and approved.
Navigation
Classic: Site Map > Journal Workbench
Lightning: Journal Workbench
Processing
Process Work Flow

Query Fields
Company: Related company will be pre-populated here.
Year: Select the reporting year for which you want to view Journal Entries.
Period: Select the reporting Period for which you want to view Journal Entries.
Get All Journal Entries: Click Get All Journal Entries to retrieve all Journal Entries of all statuses for the Period. The actions noted below will be available to use:
Actions
A user can select:
- a specific Journal record or a number of Journal records by checking the box associated with the lines required or
- all Journal records by selecting the box to the left of the JE# column heading
Test: Use this action to validate the selected Journal Entries for the Period.
Post: Use this action to post the selected Journal Entries for the Period.
For Journal Entry Header with more than 200 Journal Entry Details, the posting will happen in multiple transactions by breaking the Journal Entry Details into different posting groups. Each posting group has 200 entries, and the
Posting Clearing Account (at the
Financial Company Master) is used to force-balance subsets in each group.
 IMPORTANT
 The user can post up to 2500 Journal Entry Details under a Journal Entry Header.
 EXAMPLE
1. Consider a Journal Entry Header having 300 Journal Entry Details.
2. Upon posting, the system will take the first 199 entries in a posting group and determine the total of the Debits and Credits in those entries. If the Debit total does not equal the Credit total, the system will create an additional '200th entry' using the Posting Clearing Account that forces the set to Balance and then posts that set.
3. The system then creates a second entry to the Posting Clearing Account that reverses the first entry and includes it when posting the remaining 101 Journal Entry Details in the second posting group (this will offset the first clearing entry and also bring the remaining Journal Entry Details into balance).
New: Use this action to create a new Journal Entry. When selecting this button, a user will be directed to the Journal Entries capture screen.
Clone and Reverse: This action allows you to reverse a selected posted entry. You will have to specify the Year and the Period of reversal and if this reversing Journal Entry is to be posted immediately.
Template: Use this action to create a Journal Entry Template from a selected Journal Entry. This template can then be used for creating future recurring Journal Entries.
Delete: Use this action to delete selected Incomplete and Ready to Post Journal Entries.
Print: Use this action to print the Journal Entry. The JE template to be used for the printing is assigned per the JE Email Template field in the
Financial Company Master.
Process
- Viewing a specific Journal Entry: To view the Journal Entry, click on the JE# hyperlink. The user will be directed to the Journal Entry record.
- Sort columns: Click on the column heading to activate the sort feature - a down or up arrow will appear in the column heading. A 'down arrow' in the heading indicates that the column is sorted in descending order and an 'up arrow' in the heading indicates that the column is sorted in ascending order
- Filter on any specific column: There are 2 ways to search in a column:
- Entering in the record value in the relevant column search box, for example - to find transactions that are in status "Posted" - type "Posted" in the search box in the Status column.
- Entering the record value in the relevant column search box and clicking on the filter button. This will open up a list of filter types - for example, "Is equal to", "Starts With", "Contains", etc. Select the appropriate filter type. For example, enter "124" in the JE# and filter type "Contains". All JE#'s containing 124 in the record value will be displayed.
SEE ALSO


