Overview
This program is for use only by companies who have checked the Sessions Posting box on the AR Control screen. This program:
-
Displays a list of AR Debit and Credit Memo sessions,
-
Allows the selection of sessions for viewing, editing, deleting, and posting,
-
Allows the entry of new sessions.
For new and existing un-posted sessions, the user can enter new AR Debit and Credit Memos, and can edit or delete selected existing AR Debit and Credit Memos. For both new and existing sessions, the user can view and print selected AR Debit and Credit Memos.
NavigationAccounts Receivable > Receivable Session
Process Work Flow(s)
Processing
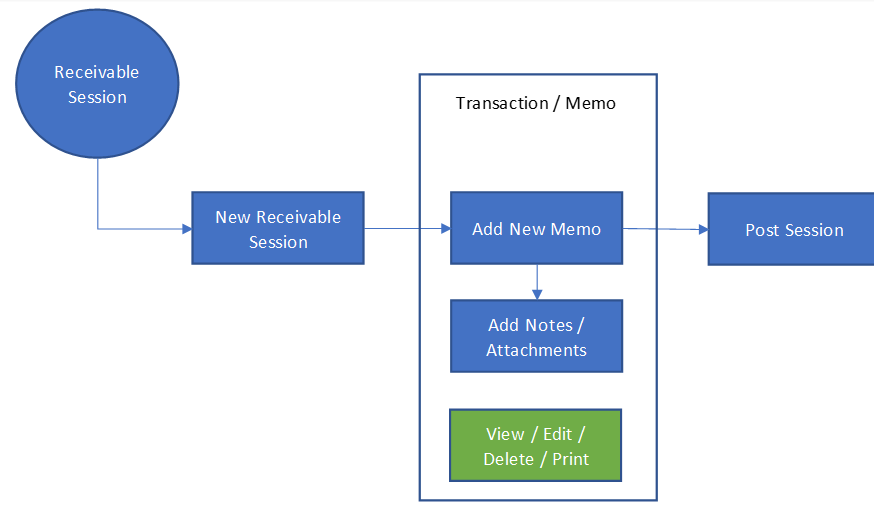
New Receivable Session
The Receivable Session process begins with a screen type called a List View. The list view provides a view of all Receivable Sessions including Company, Division and Status, as well as other pertinent information. Select an existing Receivables Session to view/edit, or add new Receivable Sessions.
The screen opens and records the Session information such as the Company and Transaction Date. The Session Number is automatically assigned on SAVE.
Session Fields
Transaction Date: The date associated with the Session. It defaults to the current date, but can be overridden. The dates must be consistent with the Fiscal and Period defined. If a user attempts to use a prior date that is in a period which is closed, a message will be displayed and the date will not be accepted.
Fiscal Year: The Fiscal Year in which the Transaction Date falls within.
Period: The Fiscal Period in which the Transaction Date falls within.
 NOTE
NOTE When the '
Use 13 Operational Periods' is
True on
System Configuration (SYCONFIG), based on the '
Transaction Date', the '
Period' will displays values from 1 to 13. When the it is
False, the '
Period' will displays values from 1 to 12.
Once you have selected the appropriate Transaction Date, select SAVE. A Session Number, the Fiscal Year and the Period will be populated. The status will be updated to Pending.
Add New Memo
To add new memo transactions to the Session, select Add New Memo
Memo Fields
Customer: The Customer associated with the transaction being entered
Transaction Type: The type of transaction this entry represents. You have the option of selecting Debit Memo or Credit Memo.
Document Number: This is a user-defined document number up to 30 characters in length. It is optional but recommended.
Transaction Date: This date will default to the Session Transaction Date but can be overridden.
Document Amount – Document Currency: The transaction amount from the Document displayed in the Document Currency.
Debit Account: The account to be debited. This field will only be available when selecting Credit Memo.
Credit Account: The account to be credited. This field will only be available when selecting Debit Memo.
Tax Class (Tax Added to Doc Amt): The Tax class to be assigned when the Document Amount excludes Tax.
Tax Class (Tax Incl in Doc Amt): The Tax class to be assigned when the Document Amount includes Tax.
VAT Only: This field designates an AR Transaction as having the entire amount be VAT.
Memo Text: This is the text that will be shown on the memo when it is displayed and printed.
Payment Terms: This will default to the terms defined for the customer. This can be overridden if the session is not yet posted.
Expected Payment Method: The payment method message associated with this memo. Picklist values are EFT, Credit Card, Check and Cash.
Division: If applicable, the Division associated with this memo
Project: If applicable, the Project associated with this memo. Where the company is configured for projects, a blank (null) project entered in this field will default to the Home project.
Dimension 1 – 8 Value: Where dimensions are setup for the Company and Division, they can be selected from the dimension dropdown menu.
Once all the information is entered, then select Save And Close.
Once the entry has been saved;
-
Notes and Attachments can be added to the transaction.
-
The transaction can be viewed and the memo printed, edited or deleted.
To add a Note or Attachment, select the Notes and Attachments link.
A Receivable Transaction Notes and Attachments screen will appear.
Fields
New Note: This will open a new screen where you will be able to add a note (title and body) and have the option to mark it as private.
Attach File: This will open a new screen where you can choose to add a file to this transaction.
When finished with this screen, the user selects Done and will be returned to the Main Receivable Session Page.
To View and Print the memo, select the View (in the Receivable Transaction List Pane) for the memo that you would like to view.
To Print the memo, select Print Memo.
The memo will be displayed and can be printed or downloaded for record keeping. The user can also email the memo by entering an email address and selecting Send Email.
Once the user has completed the session, the user can:
-
Start a new Session: This will return the user to the new Receivable Session screen
-
Post the Session: If you decide to post the Session, select Post Session. You will be prompted to confirm that you wish to post the session.
-
Delete the Session: If you decide to delete the Session, select Delete Session. You will be prompted to confirm that you wish to delete the session.
-
Cancel: This closes the current Session
SEE ALSO